Smart Tech Support

  • Subscribe to our RSS feed.
  • Twitter
  • StumbleUpon
  • Reddit
  • Facebook
  • Digg
Showing posts with label document camera. Show all posts

Wednesday, 24 April 2013

The Good, Bad and Ugly on Ladibug 2.0 Software

Posted on 07:49 by Unknown
2.0 or not 2.0 that will be the question that is answered hopefully at the end of this Blog post.

Recently the Lumens company has updated its software for its famous Ladibug brand document cameras (Doc Cam).  When Lumens decided to update from the earlier Queue to Ladibug software it was a huge transition for users to get accustomed to, but was also leaps ahead in the features that it offered.  Now recently, the Ladibug software has gone through another transition as it has upgraded from version 1.1.. to version 2.0.3.

Let's take a look at the changes and talk about the Good things.  One of the obvious changes that you will notice is that when you activate the software and hover over the Ladibug Icon you will only see a 4x4 grid.  If you remember in the earlier version you hovered and saw a 3x3 grid and then had to click the Advanced button to see the 4x4 grid.

On the 4x4 grid there have been a couple of new feature icons that have been added for you to use along with the ones that you have become accustomed to.

One of them is the Mask Mode, which is similar in look to a cover shade over the information. If you remember putting a sheet of paper over the overhead machines to block certain information you were sharing this will be the same, just through the software.

The other is the Spotlight Mode, which allows you to focus in on an area of the screen while blocking out the rest of the viewing area.


The biggest change that you will notice when you turn on the software that is completely different on version 2.0.3 is in the viewer window when you click the Display Live Image button.

You will now see something extra, the Thumbnail Viewer, which is attached to the left side of the viewer window that offers some additional available options that you have not had the ability to do before.


Any images that you take with the Camera Button will display in the thumbnail viewer for you to use.  To display one of the images, click the Thumbnail you want to use.  To go back to the live image hover over the Ladibug Icon and click the Display Live Images button again.

Some of the other features on the toolbar are:

  • You can Save the Image anywhere on your computer.  
  • Open a Directory of Images from your computer, CD-rom, Thumb Drive or other removable storage device to display inside of the Ladibug software. 
  • You can Delete items in the viewer that you do not want.  
  • You can also email images directly from the Ladibug software 

Now you know whenever there is good I always seem to find something bad to go along with it.  Well the only thing that I could find can count as both bad and ugly at the same time.  The Delete feature is the culprit that has caught my attention.  I said earlier that you can open a Directory of images and bring them into the document camera and use them in the software.  Well you will need to make a copy of all of the images first before you open them in the Ladibug software.  What happens is that the software does NOT create a duplicate of the image, it attaches to the original.  Why is that bad you may be asking?  Well it comes in when you want to Delete an image you no longer want to use.  If you Delete an image that you have pulled from a Directory.  It is permanently deleted from the original location.  Yes gone for good, I learned the hard way believe me, I lost an image that I did not have a duplicate of.  

So all in all the software update is great and so much more user friendly that its predecessor with the exception of the Delete feature.  I would have to challenge Lumens to work on fixing the system so that it will duplicate the images when you open a Directory of photos to use in the software. 

Read More
Posted in document camera, Evan Herreid | No comments

Saturday, 1 September 2012

Need Ideas for Ways to Use the Document Camera?

Posted on 10:28 by Unknown
A couple of years ago, I posted a list of 10 links offering suggestions for things teachers could do usign document cameras. When I checked the links in the post recently, I found that only three of the links still worked .... yikes! So I am posting part of the post again and adding in some more current links (working ones)!

Document cameras can be used to take pictures, videos, and even as web cams. I think teachers just need more information on the many ways these tools can be used. I know they also need the time to try things out. Even though there are document cameras in many classrooms, I do think that tool has been overlooked.

Here is a list of links to a wide variety of ways document cameras can be used in the classroom:

  • 101 Ways K-12 Teachers Use Document Cameras
  • 100 Ways to Use Digital Cameras from Scholastic
  • Ways to Use Doc Cameras with Students (from Learn 2.0)
  • Document Camera Idea for Elementary, Middle, and High School Classes
  • Ideas for Science, Social Studies, English, Math, Music, Art ...
  • Teaching 'N Technology Document Cameras in the Classroom
  • 101 Ways Kennewick Teachers Use Document Cameras
  • Document Cameras Enhance Student Learning
  • Doc Cameras in the Classroom Handout
  • Using Document Cameras in Pre-K and K Classrooms 


Read More
Posted in document camera, Melissa Edwards | No comments

Friday, 25 November 2011

Lumens DC 190 Part II

Posted on 12:12 by Unknown
In looking at the software for the new Lumens DC 190 document camera (doc cam), you do not see any changes to the 3 by 3 or 4 by 4 grid.  The software itself has been updated to v.1.0.9 for Ladibug and there have been a few updates and improvements to it for use with your computer.  Again the software is available on both PC and Mac, however I did not see on the website the availability for Linux for this new version as of yet.  All of the buttons here work just like they have in the past with one new item.  If you click the Light bulb Icon you are able to toggle back and forth between the regular lamp and the LED light on the head unit.  If both lamps are off the sequence is as follows as you click the icon; lamp, lamp and LED, LED, off.  Again the addition of the LED lamp is a nice feature because it gives you just enough light and is not as overpowering at the lamp. 


Before I go in any further I have to add in that one of the best new features that I have seen is that if you press the Menu button on the Remote Control you are able to see it in the viewing area after you have clicked the Display live images button.  And it is fully functional so there is no need to have the doc cam hooked up as a pass-through device were you are forced to toggle the source back and forth so you can make Menu changes for the doc cam hardware.

Nothing has changed in the button options when you click the Advance button.  The Capture still images, Record video and Time Lapse capture have not changed.  The Camera Settings button has changed slightly in the way that it looks for users.

I mentioned it in my first post but there are a new feature button changes, one is the PIP button which allows you to see the static images that are stored in the doc cam base along with the live image in the bottom left hand corner of the view screen.  Now a bonus is that you can use the arrow keys on the remote to move the live image around on the screen if it is needed.  Press one time to get in and select the static image and to get out you have to press it again and then the Menu button to get back to the full screen live image.  Another new button is Pan which is just a name change from the old Book button.  Nice thing is that it is a one click in and a one click out.  The Capture and Record buttons here will store the media in the built in hard drive in the base of the doc cam and not on the computer like the buttons do on the 4 by 4 grid. 

Now for what I think is the best new upgrade is that the Arrow and Menu buttons on the right side of the panel are now fully functional.  This is a big leap over previous versions where they seemed to be just ornamental and were waiting for technology and coding to catch up with them so they would work properly.

And now you that have my thoughts on the new DC 190 you can take a look for yourself to find what you think the best features are that work in your classroom situation.  If you find anything else that you like or think can add to my general overview please share your comments through the blog.


images provided by Lumens Ladibug software.
Read More
Posted in document camera, Evan Herreid | No comments

Friday, 18 November 2011

Lumens DC 190 Document Camera

Posted on 12:04 by Unknown

Finally I have recently gotten to really sit down and take a look at the new (well almost new) Lumens DC 190 document camera(doc cam) that has recently replaced the DC 166 that hit is EOL cycle.We have been using the DC 166 model for a couple of years in our school district and will now be transitioning over to the newer design model.

At first glance you do not see anything different in the look and design of the doc cam, it is their termed "Ladibug" design series.  Upon further inspection there are two noticeable items that are different in this design over earlier versions.  One is that there is a USB plug-in  instead of the SanDisk port of the earlier 166 model.  The other difference is that there is a microphone built in the front of the base now so that you can include sound with your video recordings in the camera only(presenter) mode.

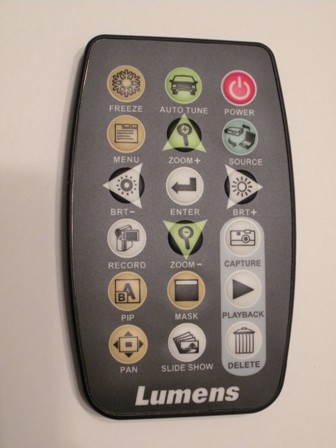
Another big change in the DC 190 over its predecessors is the redesign of the remote control.  Now you still have the standard buttons on the base of the doc cam; Capture, Playback, Zoom +/-, Power and Menu.  However there is a new look to the remote.  They have gone back to the basic black color design, which is great for those who are color blind (like me) because it makes the buttons and names stand out.  There are a couple of changes on the remote control that need to be mentioned so that you know where to look now versus earlier models.  The Source button is now located below the Power button, a big departure from having it in the top left which is now the Freeze button.  The Menu button flips over to the opposite side of its current row.  The Book button has now been replaced by Pan, which is a more appropriate name to describe the action that is associated with the buttons actions.  It still works the same way, you press it once to get into the Pan mode and then again to exit.  A huge step ahead of it previous version is what use to be the PBP button which is now PIP.  Yes it should sound familiar because it is Picture in Picture.  You have the live image in the background and then the static image in the bottom corner that you can choose from by using the selector (arrow) buttons to view the available images.  There is a new edition to the remote and that is the Mask button which similar to how you placed a piece of paper over your old overheads.  About 3/4 of the screen is darkened out on the first click, the second then puts a veil over the whole page except for a square in the middle of the screen.  You can then use the arrow keys to move the square around on the screen similar to a spotlight feature or move to reveal.

Another nice feature of the DC 190 is that there is now an LED light that is under the Head unit.  Now depending on the ambient room light you only had the option to either have the light source on or off.  Now you can select the LED light so that you still have an additional light source that is not as bright as the normal lamp light that has been on the Ladibug design for years.  The LED light source is just below the lens unit when you raise the head up at straight.  You can toggle between the modes using the Lamp option button in the Ladibug software.


Expect lots of new fun things to do with the new DC 190's in your classroom and don't forget that you can always find out more about how to use your document camera from my LiveBinder.


Document Cameras

Read More
Posted in document camera, Evan Herreid | No comments

Wednesday, 29 June 2011

Document Cameras in your Science Class

Posted on 05:59 by Unknown
Now that I have been discussing uses of Document Cameras (doc cams) in your 21st Century classroom a co-worker suggested that I give out some specific advice for teachers to use them. So what I will be doing is to provide some general topic ideas for teachers to integrate the use of their doc cams into everyday instruction.

My first installment will cover some ways to use your doc cam in your Science class. In our school system we use Lumens DC 166 models with our classroom solution. You may have another version which is perfectly fine, many of the ideas that I will be discussing will transfer easily over to other models of doc cams.

What ways can you use your doc cam in your Science class you may be asking. Or you may just be saying let's get to the point, focus.

  • 3D imaging of Atomic Models
  • Plant Growth over time
  • Dissections
  • Terrariums
  • Show live images along with book photos
  • Display experiments for entire class to see
  • Show details of Bugs and other manipulatives
  • Display "Overhead" resources and use inherent software to write over the sheet without a vis-a-vis pen
  • Make recordings of experiments, dissections, classwork and homework
  • Connect to a Microscope to show cells and cell structures from slides


These are just a small snippet of the things that you can do with your doc cam in your Science classroom. I have a
Livebinder that offers up some additional resources to help get you started in your classroom with integrating your doc cam. One last thing that you may not have thought about that your doc cam can do. Did you know that the doc cam can act as a webcam with Skype? Yes, that is what I said, and you may then be saying so what. Well did you think about how this could open your students up to areas in Science that they may not ever get an opportunity to participate in.

How, you may be asking? You can contact Science Museums where you can take a virtual field trips. You can contact Science departments in Colleges and Universities so that your students who are interested in careers can find out what it takes to become a scientist. Watch my videos to see how to set up your doc cam with Skype and use it with Office products.

Again you may be saying how will this affect me in my instructional day? As a teacher using a doc cam could factor into the new evaluation tool for Standard IV for integrating and utilizing technology in instruction. It can also encompass the new Common Core standards for using technology tools and skills to reinforce classroom concepts and activities. As well as using technology and other resources for the purpose of assessing, organizing, and sharing of information.

Stay tuned for additional posts on ways to use your doc cam in your Math, English, Social Studies and Specialty areas.


WSFCS Document Cameras
Read More
Posted in document camera, Evan Herreid | No comments

Thursday, 23 June 2011

The Document Camera AHA! Moment

Posted on 06:00 by Unknown
Recently I spent a day at a school working with teachers on ways to integrate Document Cameras(doc cams) into their instructional day more so that just as an expensive overhead. While you can still use your overhead resources, a doc cam offers teachers so much more. As I have talked about in other blog posts our school district has put a lot of time and effort into designing a 21st Century classroom solution. The solution include a doc cam for the teacher to use that is connected to the computer and can be use independently as well as with software on/through the computer.

As the workshop went on and our discussions started to focus in on the participants content areas I asked them what do they do in their classroom. Looking for specific types of responses I waited to see what would happen. A teacher spoke up and said they wanted to help their students go to college. I asked the teacher if the students knew what to expect in the process of applying to colleges. The teacher talked about what they did in the classroom from helping the students to fill out applications and getting documentation ready to send off to colleges.

I took over the conversation then and asked her how she helped them with the applications. Did you know that you can put the FAFSA form under the doc cam and focus in on a section of the application to help the students fill them out easier. The next question was, have you contacted an Admissions Dept. at a local University to talk with your students, because your doc cam can be used as a webcam? I immediately saw eyes lighting up and ears turning towards me. "I did not know that the doc cam could do that." "I had not thought about using the doc cam like that." As the conversation continued a teacher commented what could they do since they were a coach and taught PE. Immediately I asked them if there are some of his students that do not know how to dribble a basketball or soccer ball, or serve a volleyball. He said well yes there are. I responded with the fact he could use the doc cam to video tape another student performing the proper technique to dribble a soccer ball or serving a volleyball. A basic "How To" video made to help out the students. Another teacher spoke up and said I could video tape a student demonstrating proper bowing technique for Orchestra class. Another teacher said that, with a little prodding, how about video taping a mock business plan interview for critique and student review.

The light bulb lit up above each persons head and they all began talking about what they could do with the doc cam in their classroom. Even though they have had the doc cam in their classroom they just needed a little focus and encouragement, a spark to get them thinking of ways they can adapt their curriculum to incorporate the doc cam. At the end of the workshop many of the teachers came up to me and thanked me. Some said that they had never even thought about using their doc cam in the ways we talked about while other said they had never even turned theirs on yet.

There are doc cams in pretty much all of our schools in some form or another currently. If you are reading this post you may not have one but have seen one in the school before. Maybe this will spark something in you to go search out that doc cam in the building or to look at the one in your room differently. Maybe you need some more information about how to use them or some other ideas. I have created a Live Binder, linked below, on ways that you can use doc cams in your classroom as well as some general information from many of the companies that make them. Take a look for yourself and if you have questions you can ask your local on-site Technology Facilitator as well you have access to a District Instructional Technologist for your school that can help answer questions too. As well there are handouts and videos on how to use your doc cam in Learning Village our District Curriculum Warehouse. To find the information click on Resources under Curriculum and then Technology Resources.


WSFCS Document Cameras
Read More
Posted in document camera, Evan Herreid | No comments

Monday, 11 April 2011

Did U Know: Doc Cams and Other Software

Posted on 12:35 by Unknown
As you know I have been sharing a few things lately about Document Cameras with you and today is not unlike the others.

I have a new feature tool that you can utilize which you may not have thought about or had even known could really be done.

Did you know that you could take the displayed content directly from the doc cam and place it into any one of a number of different software packages that you may currently have loaded on your computer? Now I have to preface this by saying that I am a PC guy and cannot guarantee that any of the information that follows will work with a Mac. If there is anyone out there that has tried these please share them so what we can all be informed. As well I have verified just the software packages below will allow for this to occur, please share if you have accomplished this with additional software and I will update my posts.

Now it does not matter whether or not you have an Interactive White Board (#IWB) just that you at least have a computer/laptop, a doc cam and a digital projector to perform the following functions.

Within the eInstruction Workspace, ActivInspire, SMARTBoard and Office Products (Word, Excel and Power Point) you are able to insert the doc cam display directly into the product in an image format. The feature for the most part is part of the Insert Menu on all of the products in one way or another. When you choose the Insert Menu item and the Scanner/Camera option you are asked to import from a specific device. Depending on what type of doc cam you have hooked up to the computer/laptop will determine what you choose from the listed items. Here is a sample listing for some of the doc cam models on the market.

Lumens:
DC130, 150, 155, 160, 162 and 210 choose Visual Presenter V1 Twain
DC166, 260 and 265 choose Visual Presenter V2 Twain

AverMedia
:
300P and 300AF+ choose Visual Presenter V1 Twain

Dukane:
210 and 335 choose Visual Presenter V1 Twain

Embedded below are the steps per software package on how to Insert the displayed image directly into the listed software packages.


Read More
Posted in document camera, Evan Herreid | No comments

Friday, 8 April 2011

Video Killed the Radio Star

Posted on 12:57 by Unknown

In a bit of irony Steven (@web20classroom) was talking to me the other day about creating some short video tech tips that we can post and share out with the district. I said that I thought it would be a great idea. Little did I know that I would be the guinea pig in this project. Although I have plenty of years standing in front of small groups of 15 to 30 people with as many as 75 sometimes, this is something that would probably go out to many more people and would increase my digital foot print immensely. Thus causing me more anxiety than I previously thought, but I digress.


So I stressed a little bit about doing it and reluctantly said that I would dive in and be the first person to share a tech tip. So what was the topic going to be? Why not using Document Cameras with Skype. It is something that I have passion for and have learned a lot about, so I said yes lets create the video. Now the stress level kicked in. What if I mess up, or don't talk loud enough, maybe I will butcher the steps to set things up and ruined things for some people to set up their doc cam as a webcam for Skype.


Finally today hit and it was down to the wire and we needed to get going on creating the video. I mulled around for a while and finally got cornered and it was time to start filming. Surprisingly enough things went very well and we got the tech tip in on one take. So how do I feel about it, I feel great about it and will definitely do it again, so look out for more videos from not only me and @web20classroom but from the rest of the crew here at WS/FC DIT Department.


Oh, I almost forgot, here is the link to the video for our first WSFCS DIT tech tip.

Read More
Posted in document camera, Evan Herreid, skype | No comments

Tuesday, 1 March 2011

Creating Video with Sound on the Lumens DC 166 Document Camera

Posted on 16:52 by Unknown

It’s relatively simple to create a video file using the Lumens DC 166 document camera. It’s not as easy to create a video file that includes sound. So here is the way I did it. The first step is to click the video record button in the Ladibug software. You have to click the advanced button to see the video button. I do it this way so that I can choose where to save the file. I don’t want to save the video file on the hard drive of the video camera. The video is saved as an avi file. The next step is to open the video in a minimized window. This will open in Windows Media Player. I moved it the bottom half of my computer screen. I plugged in my headset (microphone/headphone combination) and double clicked the sound icon in the system tray to make sure my speaker and microphone was not muted. I opened Audacity. I played the video from the document camera and narrated the video while I recorded my voice in Audacity. Audacity has many options to edit the sound recording so it’s ok if you make a mistake. When I was happy with my sound recording, I exported it as a wav file. Then I opened Windows Movie Maker. I’m only going this option because Movie Maker is free. It wouldn’t be my number one choice, but that’s ok. Import your video file and your audio file into Movie Maker. Make sure you switch to the timeline mode of Movie Maker. Drag your video file to the video area of the timeline and the audio file to the audio/music area of the timeline. Save the project. You don’t have very many video editing options in Movie Maker. You can only cut part of the beginning or the end but keep in mind it is a free program. You would have a lot more options if you used Adobe Premiere Elements but that would run you about $50.00. The last thing you need to do in Movie Maker is to save the file so that it can be played on any computer. The file is saved as a wmv file and can be played in Windows Media Player. If you are going to record your lessons and place them on your website be sure to break up the video files so that they are not so memory intensive.
Read More
Posted in Brian Piekarski, document camera, video | No comments

Friday, 18 February 2011

Document Cameras and Skype

Posted on 06:01 by Unknown
In our district we have been working over the past few years to really ramp up the technology that is in the classrooms to benefit both our teachers and students. We have instituted a Classroom Solution specific to the grade levels with one design for the Elementary and one for the Middle/High Schools. Included in this solution we have chosen to provide document cameras as an additional input device for teachers and students to use.

Over the past couple of years I have blogged about the benefits of document cameras versus the traditional overhead projector. I have discussed its uses as a digital camera and camcorder as well as techniques to integrate it into classroom instruction. One thing I have yet to talk about is how the document camera camera can be used as a(n) webcam. Yes I said webcam.

The primary version of document cameras that we have in our district are made by the Lumens Company, but we also have others versions which will act in the same manner. When the document cameras are installed correctly and the included software is setup the computers will see them as webcams, depending of course on what programs or websites you are utilizing. In our district we have been using Skype as a method of global communications in which our teachers are collaborating with in and out of county schools, businesses, colleges and universities and interesting people.

You have to make sure that when you are using Skype the program must be able to see the doc cam and set it as the default visual device. To do this you will have to make sure that the doc cam drivers are installed on the computer you are using, see specific doc cam installation guide for setup informaiton. Once the doc cam is installed properly make sure that it is turned on and open the Skype program and log in. After you are on the Skype dashboard you will click on Tools--> Options and then Video Settings. In the video settings, depending on your setup, the live video should show up. Now one thing to remember on the video settings for Skype, in order to make sure you do not get any random video calls you need to make sure that your settings are checked to only accept video from people in your contact list. This alleviates any issues that could arise during a Skype call.

Now for two technical issues that have come up, in our district that is, when we have been using the doc cams with Skype. I will list them out and the solutions we have used to correct the problem.
  1. Image shows upside down in Skype - This usually happens when using older doc cams like the Lumens DC-133, 150, 155, 160 or 162. The solution is to turn the doc cam around and the lens unit turns down so that the image will be right-side-up.
  2. The image does not show up at all and you have an error on the screen - This has been just recently discovered. From what I have ascertained it is due to the recent upgrade of software by Skype to version 5.1 from version 4.1 - In our network version 4.1 is stable and has been the standard so what we have done is to uninstall the 5.1 software and reinstall the 4.1 which will then allow Skype to see the doc cam again.

Now this is just one of the things that you can do with your doc cam, but if you are looking for more ideas you can click on my LiveBinder below to get some additional resources.

WSFCS Document Cameras
You can also hear more about this topic and resources in our Weekly Podcast as WSFCS DIT Unplugged - Episode 11
Read More
Posted in document camera, Evan Herreid | No comments

Friday, 3 December 2010

No more Ink from Overheads on Hand

Posted on 04:32 by Unknown
Are you still using your overhead machine? Tired of dealing with cleaning the marker ink off of your hand after school each day? Since I am left handed I had ink all the way up my arm and had to scrub my arm raw every day to get rid of the ink.

Well there is a ray of light at the end of the tunnel "so to speak." If you have a Document Camera in your classroom along with an Interactive White Board or Tablet you can be ink free very soon.

With either Promethean ActivInspire or SmartBoard software you have a toolbar option that allows you to import the image directly from what the Document Camera is seeing and put it into the software and utilize the features of the program to interact and write on top of the displayed image.
Now what does this mean you may be asking? Well you can relegate that overhead to being a coat rack and use your Doc Cams and IWBs to display those old overhead sheets. Yes I am saying to keep all of those great overhead resources that you have used throughout the years just re purpose them and use them in another format.
Place that overhead sheet on top of a blank sheet of paper and then under the doc cam. Open up either the SmartBoard or ActivInspire software and in the toolbar select Inset: Image from Scanner/Camera. You will then click OK on the type of doc cam you are using(comes up as the default). Then look at the screen and there will be a new window that opens with the live image from the doc cam showing. Now click Capture on the window and it will place the image directly into your open Flipchart or Notebook file. Now it is just a matter of picking up a pen from the tray or using your stylus to begin writing on top of the overhead resource without getting any ink your hand.
Read More
Posted in document camera, Evan Herreid, IWB | No comments
Older Posts Home
Subscribe to: Posts (Atom)

Popular Posts

  • Why can't I turn down the pages?
    If you find something you like on a page in a book, what do you do? Turn down page corners ... Underline ... Highlight ... Jot in the margin...
  • Timeline = Understanding?
    I was looking through some NC History information that involved lots of dates and events. I am also reading a novel that gives lots of dates...
  • Do You Have a PLN?
    The last couple of weeks I have had some technology issues that I had either forgotten about or had never heard of before. I started to thin...
  • What are WS/FCS teachers saying about Edmodo?
    Over the past few weeks I have had the privilege to work with teachers across the district who are using Edmodo in their classrooms. Wheth...
  • What I Learned This Week ...
    This was a very interesting week. I was at several different schools meeting with teachers during their grade level planning times. I listen...
  • What are you learning about this month?
    In March, one of the themes is Women's History Month. I came across this while looking at Thinkfinity today: The theme for the 2012 Wom...
  • ActivInspire and Jigsaw Puzzles
    I have been running down my feed lists and social media outlets today and came across a neat little tool that I had to share out. When I saw...
  • Listening is Powerful
    This past week I have been attending PLC and LTM meetings in my elementary schools and talking about how I could help them with technology a...
  • What's New in SMART Notebook ver.10.8
    SMART Notebook 10.8 was released in August, and I thought I would put some of the new features here in this blog. One of the features that I...
  • Working with Layers and ActivInspire
    Lately I have been learning a lot about ActivInspire software for Promethean boards. I must say that I have really been enjoying seeing what...

Categories

  • #edchat
  • 21st Century
  • ActivInspire
  • activities
  • Administrators
  • adult learning
  • animoto
  • April Patterson
  • Art
  • assessment
  • Atomic Learning
  • Audacity
  • Black History Month
  • blog
  • Blogging
  • Bloom's Taxonomy
  • books
  • brain research
  • BrainPOP
  • Brainstorming
  • Brian Piekarski
  • broadcast
  • calendars
  • Celia Gossett
  • change
  • civics
  • Classroom 2.0
  • classroom design
  • collaboration
  • Colleen Fitzgerald
  • Common Core
  • CommonCraft
  • Conferences
  • connections
  • copyright
  • CPS
  • creativecommons
  • creativity
  • critical thinking
  • Curriculum Pathways
  • DE Streaming
  • DeLea Payne
  • Desiree Miles
  • DESTech101
  • digital
  • digital footprint
  • digital storytelling
  • Diigo
  • document camera
  • Dorene Bates
  • earth day
  • ebooks
  • edcamp
  • Edmodo
  • Edublog Awards
  • education
  • einstruction
  • ELA
  • elections
  • Emory Maiden
  • encyclopedia
  • engagement
  • english
  • environment
  • evaluation
  • Evan Herreid
  • Evernote
  • flickr
  • gadgets
  • geography
  • global
  • glogster
  • Google
  • Google Earth
  • grants
  • Hashtag
  • health
  • history
  • Ideas To Inspire
  • Ihttp://www.blogger.com/img/blank.gifWB
  • images
  • Infographics
  • Inquiry
  • inspiration
  • Instructional Technology
  • integration
  • interactive
  • Internet Safety
  • IRC
  • IWB
  • Kerpoof
  • Leadership
  • Learn and Earn
  • Learn360
  • learning
  • Learning Village
  • LearnNC
  • literacy
  • Literature
  • LiveBinder
  • livebinders
  • Mandy Durrence
  • mapping
  • Marlo Gaddis
  • Marty Creech
  • math
  • media
  • Melissa Edwards
  • microsoft
  • Mindset
  • mobi
  • mobile
  • Moodle
  • multiple intelligences
  • NASA
  • NCTIES
  • NCVPS
  • NCWiseOwl
  • netTrekker
  • news
  • newscast
  • Ocean Portal
  • online learning
  • organize
  • parents
  • PLN
  • podcasting
  • presentationtools
  • Prezi
  • Primary Source Documents
  • professional development
  • Project Based Learning
  • promethean
  • QR Codes
  • Quest Atlantis
  • questions
  • reading
  • RSS
  • scholastic
  • Schoolwires
  • science
  • search engines
  • SimpleK12
  • simulations
  • skype
  • SMART
  • social bookmarking
  • Social Media
  • social studies
  • STEM
  • Steven Anderson
  • strategies
  • StudyBlue
  • StudyLadder
  • summer
  • Symbaloo
  • teacher tips
  • TeachersDomain
  • technical
  • technology
  • Technology Coaches
  • technology integration
  • TED
  • Television
  • Thinkfinity
  • Tiki-Toki
  • timelines
  • TPACK
  • training
  • Twitter
  • video
  • virtual field trips
  • virtual worlds
  • vocabulary
  • voicethread
  • Weather
  • web 2.0
  • web-based tools
  • webcam
  • Webinars
  • websites
  • Wife Swap
  • wikis
  • Wonderopolis
  • wordclouds
  • wordle
  • Works
  • writing

Blog Archive

  • ▼  2013 (19)
    • ▼  November (4)
      • Why can't I turn down the pages?
      • School News: Drum Up Some Business
      • The Instructional Technology Wife Swap
      • Symbaloo!!!!!!
    • ►  October (2)
    • ►  September (3)
    • ►  August (2)
    • ►  June (1)
    • ►  May (3)
    • ►  April (2)
    • ►  February (1)
    • ►  January (1)
  • ►  2012 (104)
    • ►  November (3)
    • ►  October (5)
    • ►  September (3)
    • ►  August (6)
    • ►  July (5)
    • ►  June (12)
    • ►  May (10)
    • ►  April (17)
    • ►  March (17)
    • ►  February (13)
    • ►  January (13)
  • ►  2011 (268)
    • ►  December (16)
    • ►  November (21)
    • ►  October (21)
    • ►  September (19)
    • ►  August (14)
    • ►  July (21)
    • ►  June (37)
    • ►  May (26)
    • ►  April (24)
    • ►  March (29)
    • ►  February (23)
    • ►  January (17)
  • ►  2010 (109)
    • ►  December (17)
    • ►  November (29)
    • ►  October (12)
    • ►  September (13)
    • ►  August (11)
    • ►  July (16)
    • ►  June (11)
Powered by Blogger.

About Me

Unknown
View my complete profile